5  Hugging Face Model

5.1 两种调用模型的方式

查找 GPU 设备。

import torch
from pprint import pprint

# select the device for computation
if torch.cuda.is_available():
    device = torch.device("cuda")
elif torch.backends.mps.is_available():
    device = torch.device("mps")
else:
    device = torch.device("cpu")

print(f"using device: {device}")
using device: mps

图片数据。

import io
import requests
from PIL import Image

url = "http://images.cocodataset.org/val2017/000000039769.jpg"
image = Image.open(requests.get(url, stream=True).raw)

5.1.1 使用 Pipeline

# Use a pipeline as a high-level helper
from transformers import pipeline

object_detector = pipeline("object-detection", model="facebook/detr-resnet-50", device=device)

detection_results = object_detector(image)
pprint(detection_results)
[{'box': {'xmax': 175, 'xmin': 40, 'ymax': 117, 'ymin': 70},
  'label': 'remote',
  'score': 0.9982202649116516},
 {'box': {'xmax': 368, 'xmin': 333, 'ymax': 187, 'ymin': 72},
  'label': 'remote',
  'score': 0.9960021376609802},
 {'box': {'xmax': 639, 'xmin': 0, 'ymax': 473, 'ymin': 1},
  'label': 'couch',
  'score': 0.9954743981361389},
 {'box': {'xmax': 314, 'xmin': 13, 'ymax': 470, 'ymin': 52},
  'label': 'cat',
  'score': 0.99880051612854},
 {'box': {'xmax': 640, 'xmin': 345, 'ymax': 368, 'ymin': 23},
  'label': 'cat',
  'score': 0.9986783862113953}]

5.1.2 直接使用模型

# Load model directly
from transformers import AutoImageProcessor, AutoModelForObjectDetection

image_processor = AutoImageProcessor.from_pretrained("facebook/detr-resnet-50", device=device)
model = AutoModelForObjectDetection.from_pretrained("facebook/detr-resnet-50")

5.2 对象检测

DEtection TRansformer(DETR)模型,通过端到端训练在 COCO 2017 对象检测数据集上进行训练(包含 118K 张标注图像)。

DETR 模型是一种具有卷积骨干的编码器-解码器变换器。在解码器输出之上添加了两个头部,以执行对象检测:一个线性层用于类别标签,一个多层感知器(MLP)用于边界框。该模型使用所谓的对象查询来检测图像中的对象。每个对象查询都在寻找图像中的特定对象。对于 COCO,设置的对象查询数量为 100。

模型使用“二部匹配损失”进行训练:将预测的 N=100 个对象查询中的每个类别的预测框与 ground truth 注释进行比较,填充到相同的长度 N(如果一张图片只包含 4 个对象,那么 96 个注释将只是“无对象”作为类别,“无框”作为框)。匈牙利匹配算法用于在每个 N 查询和每个 N 注释之间创建最优的一对一映射。接下来,使用标准交叉熵(对于类别)以及 L1 和通用 IoU 损失的线性组合(对于框)来优化模型参数。

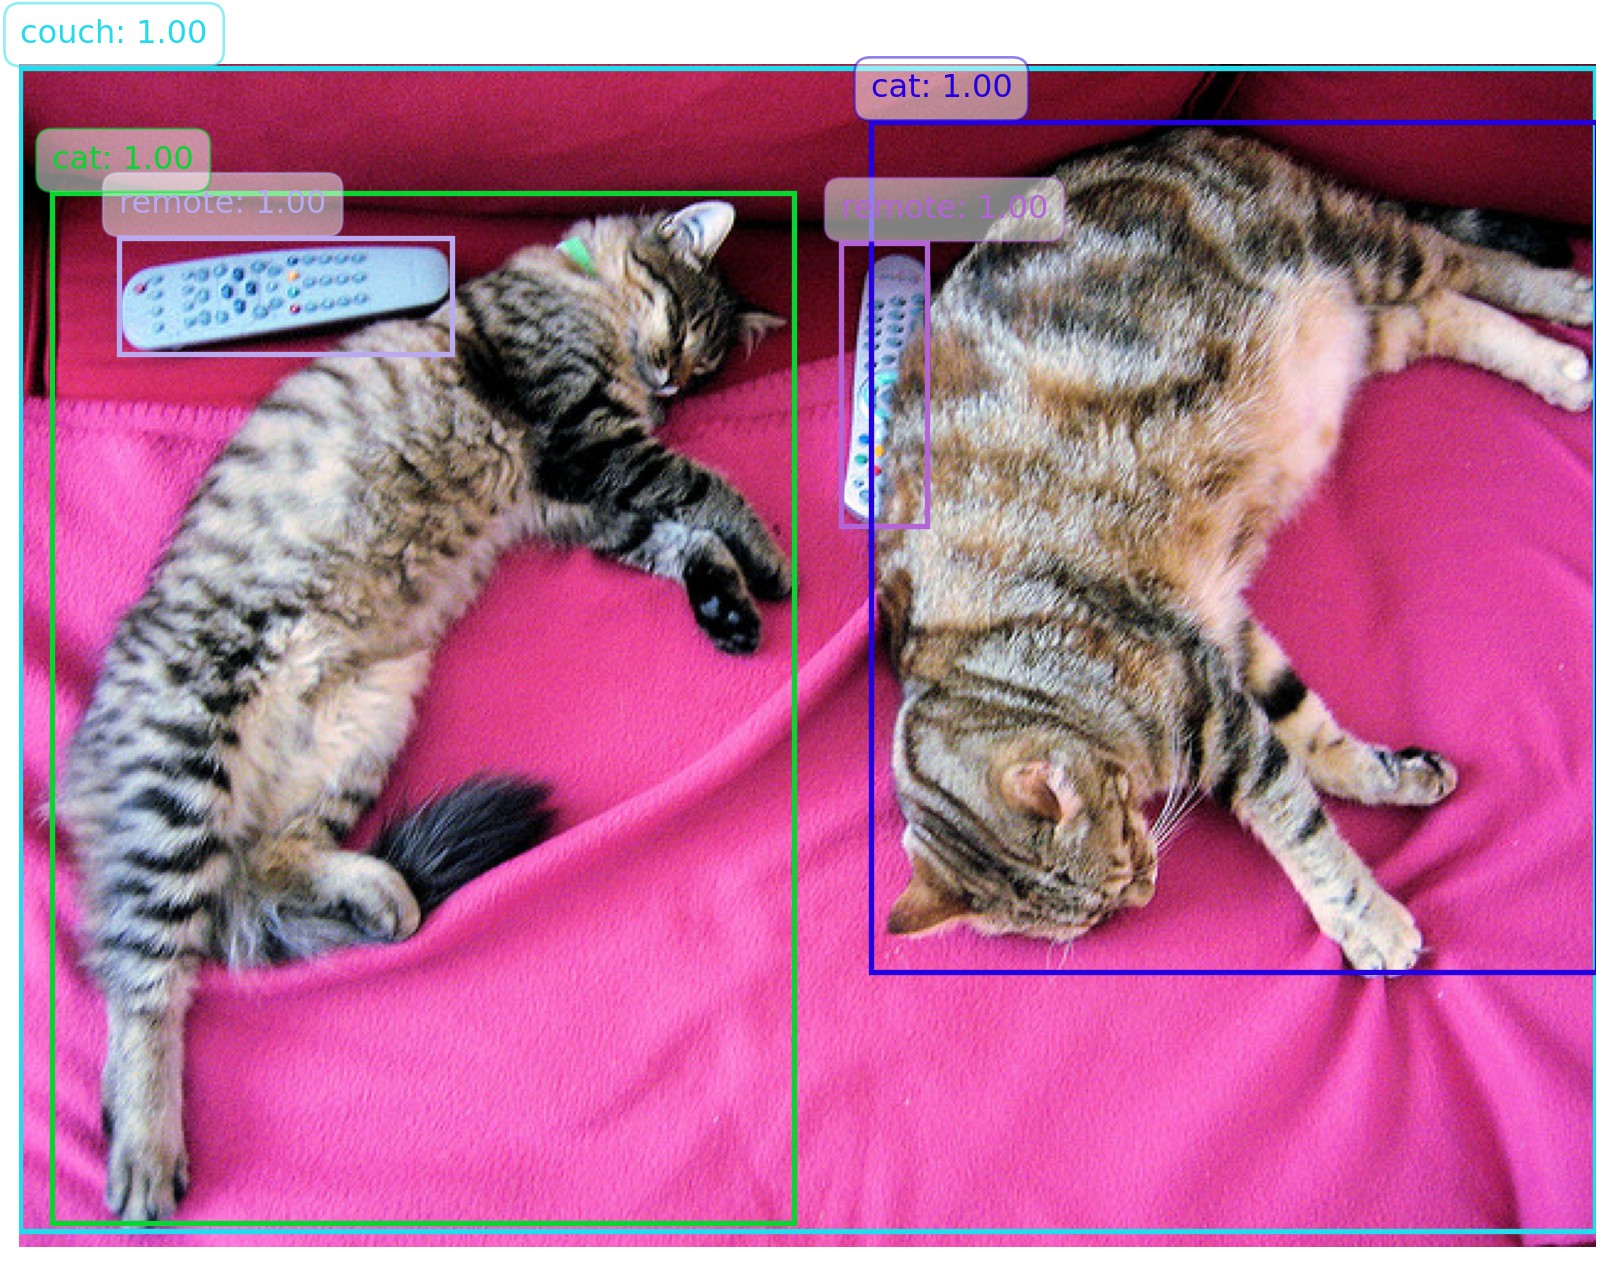
下面是使用第一种调用方式调用 DETR 模型时结果的处理示例。

import matplotlib.pyplot as plt
from PIL import Image
import numpy as np
import matplotlib.patches as patches

def random_color():
    """Generate a random color."""
    return np.random.rand(3,)

# Create a figure and axis for plotting
fig, ax = plt.subplots(1, 1, figsize=(12, 8))

# Display the original image
ax.imshow(image)

# Overlay bounding boxes and labels with random colors
for result in detection_results:
    score = result['score']
    label = result['label']
    box = result['box']
    
    # Generate a random color
    color = random_color()
    
    # Draw bounding box
    rect = patches.Rectangle(
        (box['xmin'], box['ymin']),
        box['xmax'] - box['xmin'],
        box['ymax'] - box['ymin'],
        linewidth=2,
        edgecolor=color,
        facecolor='none'
    )
    ax.add_patch(rect)
    
    # Draw label and score with the same color as the rectangle
    label_text = f"{label}: {score:.2f}"
    ax.text(
        box['xmin'],
        box['ymin'] - 10,
        label_text,
        color=color,
        fontsize=12,
        bbox=dict(facecolor='white', alpha=0.5, 
                  edgecolor=color, boxstyle='round,pad=0.5')
    )


# Hide axis
plt.axis('off')

# Show the plot with bounding boxes and labels
plt.show()

下面是对第二种调用方式结果处理的方法。

# prepare image for the model
inputs = image_processor(images=image, return_tensors="pt")

# forward pass
outputs = model(**inputs)

# convert outputs (bounding boxes and class logits) to COCO API
# let's only keep detections with score > 0.9
target_sizes = torch.tensor([image.size[::-1]])
results = image_processor.post_process_object_detection(
    outputs, 
    target_sizes=target_sizes, 
    threshold=0.9)[0]

for score, label, box in zip(results["scores"], results["labels"], results["boxes"]):
    box = [round(i, 2) for i in box.tolist()]
    print(
            f"Detected {model.config.id2label[label.item()]} with confidence "
            f"{round(score.item(), 3)} at location {box}"
    )
Detected remote with confidence 0.998 at location [40.16, 70.81, 175.55, 117.98]
Detected remote with confidence 0.996 at location [333.24, 72.55, 368.33, 187.66]
Detected couch with confidence 0.995 at location [-0.02, 1.15, 639.73, 473.76]
Detected cat with confidence 0.999 at location [13.24, 52.05, 314.02, 470.93]
Detected cat with confidence 0.999 at location [345.4, 23.85, 640.37, 368.72]

5.3 YOLOv8

YOLOv8 需要使用 pip 或者 conda 安装。安装后提供 cli 和 Python 等两种运行方式。详情参见:https://docs.ultralytics.com/quickstart/。

5.4 ViT 图像分类

The Vision Transformer(ViT)是一种以监督方式在大量图像集合(即 ImageNet - 21k)上进行预训练的 Transformer 编码器模型(类似于 BERT),图像分辨率为 224x224 像素。接下来,该模型在 ImageNet(也称为 ILSVRC2012)上进行微调,这是一个包含 100 万张图像和 1000 个类别的数据集,图像分辨率同样为 224x224。

图像作为一系列固定大小的补丁(分辨率为 16x16)呈现给模型,这些补丁是线性嵌入的。还在序列开头添加一个[CLS]标记,用于分类任务。在将序列输入到 Transformer 编码器的层之前,还添加了绝对位置嵌入。

通过对模型进行预训练,它学习到图像的内部表示,然后可用于提取对下游任务有用的特征:例如,如果您有一个带标签图像的数据集,则可以通过在预训练的编码器顶部放置一个线性层来训练标准分类器。通常会在 [CLS] 标记的顶部放置一个线性层,因为此标记的最后一个隐藏状态可以视为整个图像的表示。

image_classifier = pipeline("image-classification", 
                            model="google/vit-base-patch16-224", 
                            device=device)

class_results = image_classifier(image)
pprint(class_results)
[{'label': 'Egyptian cat', 'score': 0.9374417066574097},
 {'label': 'tabby, tabby cat', 'score': 0.038442544639110565},
 {'label': 'tiger cat', 'score': 0.014411404728889465},
 {'label': 'lynx, catamount', 'score': 0.003274324582889676},
 {'label': 'Siamese cat, Siamese', 'score': 0.000679593242239207}]

5.5 ViT 特征提取

视觉转换器(ViT)模型在 ImageNet-21k 上预训练,包含 1.4 亿张图片和 21843 个类别。其分辨率为 224 x 224。

from transformers import ViTImageProcessor, ViTModel
from PIL import Image
import requests

url = 'http://images.cocodataset.org/val2017/000000039769.jpg'
image = Image.open(requests.get(url, stream=True).raw)

processor = ViTImageProcessor.from_pretrained('google/vit-base-patch16-224-in21k')
model = ViTModel.from_pretrained('google/vit-base-patch16-224-in21k')
inputs = processor(images=image, return_tensors="pt")

outputs = model(**inputs)
last_hidden_states = outputs.last_hidden_state

BaseModelOutputWithPooling 是 Hugging Face 的 transformers 库中的一个类,用于模型输出的表示。这个类通常在模型返回的输出中包含了池化层的结果,这对于一些任务,比如文本分类或嵌入生成,特别有用。

5.5.1 主要功能

BaseModelOutputWithPooling 类是从 BaseModelOutput 派生而来的,它包含以下几个重要的组件:

  • last_hidden_state:模型在所有隐藏层的输出,这些输出通常用于获取序列的特征表示。
  • pooler_output:经过池化层(通常是池化后的第一个 token)的输出,用于获得序列的整体表示。对于 BERT 等模型,这通常是 [CLS] token 的输出经过池化操作的结果。
  • hidden_states(可选):模型在每个隐藏层的输出(如果 output_hidden_states=True 时会返回)。

5.5.2 用途

  • pooler_output:这个输出是用来获取序列的整体表示的,例如用于分类任务。对于很多预训练模型来说,这个输出是对 [CLS] token 的表示经过池化后的结果。
  • last_hidden_state:如果你需要对每个 token 的表示进行进一步的处理或分析(例如,进行序列标注任务),这个输出将是有用的。

5.5.3 示例

以下是如何在使用 Hugging Face 模型时,利用 BaseModelOutputWithPooling 获取模型输出的一个例子:

# Extract the output
last_hidden_state = outputs.last_hidden_state  # Shape: [batch_size, sequence_length, hidden_size]
pooler_output = outputs.pooler_output  # Shape: [batch_size, hidden_size]

print("Last hidden state:", last_hidden_state.shape)
print("Pooler output:", pooler_output.shape)
Last hidden state: torch.Size([1, 197, 768])
Pooler output: torch.Size([1, 768])

5.5.4 说明:

  1. last_hidden_state:通常是三维张量,形状为 [batch_size, sequence_length, hidden_size]
  2. pooler_output:通常是二维张量,形状为 [batch_size, hidden_size],用于表示整个序列的特征。

BaseModelOutputWithPooling 是一个结构化的返回对象,帮助你从模型中提取有用的特征表示,特别是当需要处理序列数据时。